Showing posts with label decorating. Show all posts

Monday, October 21, 2013

Our Jardin d'Enfants

September has left the building and it took October right along with it. No seriously, where have these months gone?? Fall has been busy in the Sanders household. Some fun things like a Halloween shindig this past weekend. Some not so fun things like Livia getting sick this past week for the first time (hello torture!). Something that has been for a long time in the works but only took shape at the end of August (and thus contributing to the busyness) is a project I've been working on in our church's nursery. A couple of years ago Christiane, an awesome lady from my church, asked me if I'd consider coming on board with her in co-leading the church nursery (apparently rumor has it that I like kids or something). I told her yes but on one timid condition...could we please makeover just about the ugliest nursery I've ever seen? (may or may not have been said in those terms...) Who knew but Christiane was just waiting for someone to wrangle this room into something cute.

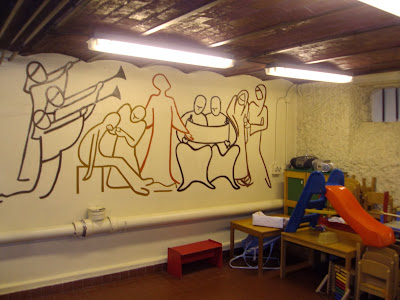
The room started out as a youth group room back when dinosaurs roamed the earth... Check out this amazing wall mural (it screamed baby/toddler, I know...):


If the room looks yellow to you it's because there is only a tiny window (really more of an escape latch just in case the zombie apocalypse happens anytime soon) which means a serious lack of light and to top off the situation, the walls were what I like to call dirty cream/I want to throw up/not quite yellow but far from off-white... Plus did I mention the ceiling was painted brown brick? A gorgeous combo, let me tell ya. 


My plan was to attack the oppressive feeling the room conveyed as well as ad some much needed toy storage. Because, well, this is what I was working with (can you say bare??):


Basically we started by dousing the room in white paint and that alone made a huge difference. Here's what it's looking like these days: 


I've been trying to play around with a garden theme because in French it's called a "jardin d'enfants" (garden of children). I like the idea that just as a garden grows, we're growing little souls that will one day (hopefully) embrace Christ as their creator. Planting seeds and all that jazz. 


The tree is actually just a wall sticker so it can peel right off whenever we want to change things up and the Ikea cups/wall bar are fabulous for holding our markers and crayons in. 


A few more befores and afters... 


That was the small baby corner--not the most inviting environment for new mamas and papas... I simplified things up back there and added a couple of nursing chairs. The bookcases make for a natural separation between to two spaces which is a good thing because our nursery is for ages 3 months to 3 years. 


Here's the book corner I made: 


I wanted to create a nice happy and calm spot for some of the kids to relax in while at the same time having a natural meeting place in case we want to sing songs or look at a bible story together. (Hello toy storage!!)


On the other side of a very long and narrow room we kept most of the same furniture but with a new paint job to freshen things up a bit. This is supposed to be the more active part of the room. 


So far it's gone over pretty well with the kiddos so I'm excited to throw in a few more finishing touches along the way! It's so fun to finally feel like I'm finding more of my niche in our church community. A lot of work, but so worth it :) 


Monday, May 20, 2013

Nursery Reveal

Warning: tons of pictures. Risk of eyes going fuzzy if complete post is read. 

That said, here be the Livster's new crib... haha get it? You guys love my lame sense of humor. Really. 


But before we get into the happy baby room pictures, let's just back up a bit and look at what the room looked like when we moved in, shall we? 


Wow, just makes you want to move right in, doesn't it? But alas, after months of living in our humble abode, it still looked like this...


and this... 


We finally controlled a bit of the chaos to get it looking like this: (already a huge improvement)


By now it was a bit more ready for some nursery lovin' 


But what to do and how to decorate? Oh the questions that plague us decor freaks. Enter Pinterest, my lovely frenemy (enemy + friend = frenemy). I spent untold (really, it's in my best interest not to tell you guys just how much time I spent on there) hours scouring Pinterest, pinning room pictures that I liked and vetoing anything involving ruffles (unless of course you count the ruffled polka dot bloomers that I just ordered). Unfortunately this did not lead to the genius breakthrough that I was hoping for. The future baby room was just as depressing as ever--no longer an eruption of unorganized crap but far from being the cozy space I was hoping for. After lots of whining and griping to Matt, I had an original idea: make my own real live Pinterest board (haha, it's not like that's what design savvy people did before Pinterest came to be or anything...)! So that's just what I did; it didn't take me long to print off my favorite pics from my online board and tack em' up on those oh so white nursery walls. 


It was like finally connecting the dots in my head: I was going for a light, breezy style with playful pops of color and a dose of femininity (a mini femininity that is!). I desperately wanted to go with a pink metallic polka dot wall like pictured above but alas my hopes were crushed by Amazon and their anti international polka dot shipping grumpiness. (Can you tell I have a slight obsession with polka dots?)  In the end the window wall became more the focal point anyways so I guess my anti-Amazon rants were all for naught. 


We were super blessed when it came to financing the room; Matt's parents bought us the couch, the dresser (repainted) and Ikea Expedit shelves we already owned, and the crib/mattress were donated to us along with tons of clothes and baby things. All that was left to buy was the giant white armoire (more on that later) and nursery accessories (let's be honest, that's the funnest part anyways...). 


There's lot of stuff from Ikea (as you probably noticed) like the curtains/blinds, baskets, etc. The rug is from an online French store called La redoute as are some of the toys I couldn't resist (the wooden whale puzzle, the stacking rings, and the little deer pull toy). The yarn ball garland is from a Paris boutique chain called La Case de cousin Paul that I seriously drool in front of every time I walk by (I'm surprised I'm not on some stalker watch list by now). 


The picture is a print from Showler & Showler (I probably could have bought half the store if had enough wall space for all that cuteness) and the postcards are all ones I've had laying around hoping for a project like this. The whale was birthed from a random idea and  ginormous planks of cardboard I had taking up space. Looking at a sketch of a whale, I penciled in my own version onto one of those big pieces of cardboard then covered it in leftover chalkboard paint. When that was dry I added in the details to the whale with some white chalk. Gotta love free projects.


One of the challenges in a French room is that there are rarely closets so I needed some kind of baby clothing storage system. Enter our previous dresser (it used to be light turquoise and can be seen here) that I slapped some paint onto, threw a changing mattress on top of, an Ikea metal bar and some child sized hangers and we were good to go! 


These bookshelves are just Ikea spice racks painted.


Here's what that side of the room looks like... 


Over the door I added a hanging shoe rack to contain all of little miss' accessories. Seriously, that girl already has quite the shoe and accessory collection going on. I might be alarmed if it weren't all so darn cute! Above the bookshelves is a wooden vintage alphabet that I picked up for 3 euros at a second hand sale. And to the left of the door is where Liv will eventually hang up her coats and whatnot. 


Here's a few close ups: 
(eventually I hope to replace some of the postcards with baby/family pics) 


The yarn ball garland actually lights up--very helpful for sleep deprived mommies during nightly feedings and dispelling monsters once Baby S is a little older... 


For the more astute among you, you'll have noticed something wonky with the picture frames. One still requires a little art project (will show later) and the other I'm waiting for baby to come so I can put in a good pic. 


Well this be the last one...you forever have my kudos if you actually made it to the end of this!


Tuesday, February 5, 2013

Home Tour: The Bathroom


Ah...yes. Everybody's fav spot: the bathroom. Just kidding. You might notice that there is one thing noticeably lacking in ours (hint: it starts with a T and it's not me!). That's because we have what we like to affectionately call "The John." Our toilet is so special that we have a whole other room for it... Haha it's a European thing I think. 

Here she be in all her back in the day glory:  
(Matt's still working on his model face)


Sorry the pics aren't super clear--it's such a small room that getting a 'wide angle' shot just wasn't happening.... 
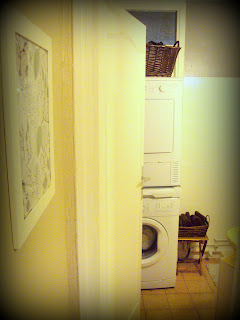
The white behind the dryer is actually a door originally leading to the kitchen that was blocked off by the owners at some point. Too bad...could have made for some great practical jokes from the kitchen... 


To Matt's profound relief, it was blocked off and made for the perfect laundry nook. There's actually a pull out drawer in between the front loading washer and dryer (which my smart in-laws passed on to us at the beginning of the move) which serves to stabilize the dryer on top and provides an instant folding/sorting shelf. I love it because it makes loading dry clothes out of the dryer and into the laundry basket (on top) super fast and easy (a great thing for a lazy butt like me). 


I can't begin to tell you how much I hated the bathroom tile before. I think it was borderline obsessional. So in order to preserve his wife's sanity, Matt asked the landlords if we could paint the wall tiles (paint is getting so sophisticated these days!). After reassuring them that we weren't thinking lime green or barbie pink, I got to work painting my bathroom world white. Of course that led to more problems because now suddenly I noticed that the walls above the tile weren't actually white but really more a dirty cream color. I'm telling you--I've got a problem. So now I buy dark gray bathroom paint and slap some of that up there. Much better. That and a shower curtain (compliments of my parents who actually managed to bring both the curtain and the adjustable curtain rod in their suitcases!)... 


...and suddenly my butt-ugly bathroom was transformed into a very relaxing, non-obsessional space! Ahh, the power of decorating. 

We didn't have a place for a hand towel either so I popped up a stick-on hook onto the wall that's been working great for us ever since! 


And then for a bit more added practicality we sneaked in a few more laundry tools. The metal iron/ironing board holder is actually one I randomly chanced across at a yard sale last spring...


And there you have it: our salle de bain


Thursday, July 26, 2012

Home Tour: the Bedroom

True confessions: I am undeniably one of those people who cannot live in a space without changing it--sprucing it up if you will. I was the girl who put up paper snowflake decorations in her dorm room at Christmas when I should have been studying (who has time to put up snowflakes?!?). Neighbors get annoyed (I have this annoying tendency to pull out the drill just before quiet hours end) and landlords hate me. But I just can't leave it be. Good enough or not bad just don't work for me. My friend Charis and I still laugh over the time we decided to hang a new piece of artwork in the apartment we shared...only to rearrange the whole living room just to accommodate the artwork.... So yes, clearly, I need help...

Here's what our bedroom looked like when we moved into our place this past October: 

Sorry, I only got just that one shot/angle. The walls were covered in this creamy/yellowy textured wallpaper (hard to see from the lighting in the pic) that to be fair, wasn't awful. But once I get an image in mind of what I want a place to look like, I just can't rest until it gets there... 

Here's what the bedroom is currently looking like--not 100 % finished (will that ever happen?) but I definitely prefer it to what we had going on before: 


I wanted to add lots of white because I wanted the room to feel super light and airy (aka restore my sanity temporarily after a crazy day with the kiddos). I know it probably not what everyone would go for, but Matt and I are loving it... 


Matt actually helped pick out and put up the wallpaper on the far wall (who knew I had such a decor savvy guy?). And for all of you who are currently horrified that I threw up wall paper after I had just taken a bunch down, not to worry--it's actually made a comeback over here and is super easy to put up and also take down now (trust me--I've experienced this after taking it down from three walls in the bedroom). So if I get tired of the gray way I just swap it out with something else that I like better at any point down the road. 


Yay for window sill flowers :) 


ps. in case it's not clear, three walls of the room are white and one is wallpapered.


Of the three frames I've got going on above the dresser, one is the wine cork jewelry holder that I shared about in this post, one another jewelry holder that I'll share more about later, and the third is actually a super easy computer project. I saw a print very similar to the 'love' one that I have there, but I knew if I copied and pasted it that the image would turn out all blurry and not as sharp. So I copied and pasted into paint shop (you know, the dinky program that comes with just about all non Mac computers), then I took the eye dropper and clicked on the color since I was going to have a hard time figuring out that soft gray blue in paint shop custom colors. After that I deleted the pic I'd copied and pasted because I didn't need it anymore. Then I just colored the background blue, wrote one letter at a time in white and dragged it to where I wanted it, printed it off, and voila! Instant print for my frame. 


So that's the bedroom!